Very Large Array, Socorro, United States

Alerting Estonian Citizens with Azure

Why not take advantage of the public cloud? Read how the system for transmitting alarm messages to consumers was born in Estonia. With this piece of writing, we go through one specific and technical real-life journey from the birth of an idea to its implementation in the Microsoft Azure cloud environment.


The author of the article works for the company Solita as a Data Engineer since 2019 and specialises in cloud-based data platforms. By now, he has accumulated more than 20 years of experience in various fields of the IT sphere – development, architecture, training. Many interesting projects have been made both in Estonia and abroad.

The beginning

In the digital state’s Hackathon event, Solita addressed the transmission of government’s cultural messages to televisions via an Android app.

In parallel, the Ministry of the Interior’s IT Centre (SMIT) pointed out a similar need. Sending alarm messages from the SITREP (Situation Reporting) system to the mobile application ‘Ole valmis!’ (‘Be ready!’) was considered. The purpose of that application became to warn the user of a nearby accident or deteriorating weather (such as a snowstorm, or a coastal flood).

In conclusion, since the pattern was the same, it seemed reasonable to create a single, unified solution.

Problems and objectives

SITREP did not have a public interface for requesting messages, but it did have the functionality to send messages. So it was possible to interface the system directly with the back-end of the ‘Ole valmis!’ (‘Be ready!’) application. The following goals emerged in the process of the Hackathon, which led to the development of a separate cloud-based system.

  • Transmission of messages (push and pull) must be possible to several channels in parallel, whoever the consumer is.
  • The messaging functionality must be separate from SITREP.
  • The interface must be secure so that a malicious actor cannot send false alarms.
  • It must be easy to administer.
  • It must be possible to subscribe / categorise messages by subject and location.
  • Setting up the system must be quick and easy.
  • The system must be flexible and inexpensive to maintain.
  • The available development time is a couple of man-months.

Why Microsoft Azure?

Solita participated in the Hackathon in partnership with Microsoft, which is why Azure was chosen as the cloud environment – although similar solutions could be created with the help of AWS or Google, for example. Azure also provides some direct benefits.

  • Most components can be easily integrated with Active Directory (although Active Directory was not an end in itself in the first iteration, this was one argument to consider in the future).
  • The range of services (in other words – the arsenal of ‘building blocks’ of the completed system) is really impressive and also includes exclusive components – in the following we will take a closer look at some of them.

For example, API Management is, to put it simply, a scalable API gateway service, and as a big bonus, it includes a public Web portal (Developer Portal) that is convenient for both the user and the administrator. In addition, the interface can be redesigned to suit your needs. The main value comes precisely from the ease of use – you don’t have to have much Azure-specific knowledge to sign up, send / receive messages, set the final destination, describe conversion rules.

The Developer Portal provides developers with pre-written sample code for consuming messages (presented in cURL, C#, and Python, for example). In addition, of course, a built-in firewall, resilience, and resistance to DDoS-type attacks are provided. All of the above saves a lot of time (and money!) from the user’s, administrator’s and developer’s point of view.

Infrastructure creation process

From the architect’s point of view, the aim was to create a system based on the most standard possible components (provided by Azure itself), and the installation of which would be simple enough for anyone with a basic knowledge of the working principle of the cloud. Account had also to be taken of the fact that the requirements were also still evolving.

From the beginning, we relied on the principle of IaC (Infrastructure as Code) – the entire infrastructure of the solution in the cloud is unambiguously described as human and machine readable code. In addition, the installation process would be incremental (if a new version is created, the existing infrastructure could be updated instead of recreating), configurable and automated; the code would be as clear and editable as possible. Figuratively speaking, you press ‘deploy’ and you don’t need much else.

All of the above is made possible by a tool called Terraform, which is quite common, especially among those who administer infrastructures – so-to-speak the de-facto standard for precisely cloud infrastructures. It is a free tool produced by HashiCorp that is perfect for situations like this – a person describes in a code what resources he needs, and Terraform interprets the code into instructions that can be understood by the (cloud) environment to create, modify or delete them.

Terraform has the following strengths that were the decisive factor:

  • its spread and wide platform support,
  • the ability to ‘remember’ the state of the installed infrastructure,
  • the simple but powerful HCL language that can be used to describe even complex logic.

The method officially supported by Microsoft for achieving the same are ARM templates (ARM templates are essentially structured static JSON or YAML). The entire Azure infrastructure can be described based on purely ARM templates, but then more code is created and the possibilities of directing the installation logic are greatly reduced.

Changing requirements and options

The first thing that the work continued on was creating a message store (for pull scenario and debugging).

The initial understanding of the message format was quite simple:

  • single-level JSON,
  • a few required attributes (timestamp, author, etc.),
  • rest of the schema was completely open.

Based on the above and on the principled decision to use only Microsoft Azure components + to install the entire solution with a single command, two options remained on the table for storing and reading JSON data without a defined schema:

  • Table Storage (default; although by operating principle it is a key / attribute type service),
  • Cosmos DB.

The ability to query data via HTTP(S) (less development work) and a lower cost (especially important in the prototype phase) spoke in favour of Table Storage; Cosmos DB had the advantage of storage flexibility, as it stores data in several regions. However, the situation was changed by the fact that SITREP’s messages came as a multi-level JSON and some of the critical attributes were at a ‘deeper’ level. Therefore, Table Storage no longer met the new requirement and the Cosmos DB component had to be introduced instead.

In addition, there was a real possibility that the system would be used in a context other than alarm messages – it had to be taken into account that the system could be used for transmitting virtually any message from many senders to different channels in different combinations. In essence, the goal became to create a messaging platform (Message Service Provider) that would functionally resemble the products of Twilio or MessageBird, for example.

Not a single line of ‘real’ code

So, by now, the following was architecturally in place:

  • all incoming messages and queries went through API Management,
  • all messages were stored in the Cosmos DB database.


At the same time, pushing messages to destinations through API Management remained an open issue. And exactly which component handles the database of messages and destination addresses?

Microsoft Azure offers options for almost any scenario, from an application hosted on a virtual machine to a serverless component called Azure Function. You can also use a number of intermediate variants (Docker, Kubernetes, Web App), where the user may or may not have direct access to the server hosting the application.

In the context of the present solution, all the above solutions would have meant the following:

  • a person with a developer background would have been needed to create the system,
  • the system as a whole could no longer be installed very easily – the application code would have been separate from the infrastructure code.

Fortunately, Azure has provided the Logic App technology that addresses the above issues. It’s a way to describe business logic as a flowchart – for example, you can visually ‘draw’ a ready-made Logic App ‘application’ in the Azure Portal, using the online interface.

It is true that in more complex cases, such as conversion operations, you will probably need to write a few lines of code, but this is far from traditional programming. Writing Logic App code is more akin to developing Excel macros than Python or Java.

The Logic App flow code can be saved as an ARM template, and the ARM template can be used as part of a Terraform installation script – making the Logic App a great fit for this context. Starting a single workflow in this solution costs in the order of 0.0005 euros per occasion (according to the consumption-based plan) – yes, there are even cheaper solutions like Azure Function, but in this case the infrastructure needs to be installed and developed separately.

Support components

Azure has well-thought-out tools for monitoring the operation of the system; in this case we focus on two of them: Azure Monitor and Log Analytics. The first, as the name suggests, is a set of dashboards provided by the Azure platform that help monitor the status of applications and components (including in real-time), such as load, memory usage, and user-defined metrics.

Since the Monitor is ‘included’ with every solution by default, it may not be correct to consider it as a separate component – it is simply a question of displayed indicators. Log Analytics, on the other hand, is a place to direct the logs of all components so that they can be conveniently analysed and queried later. This helps detect system errors and quickly track down errors. You can even query Log Analytics for metrics to display later in the Monitor, such as the number of errors per day.

Results and observations

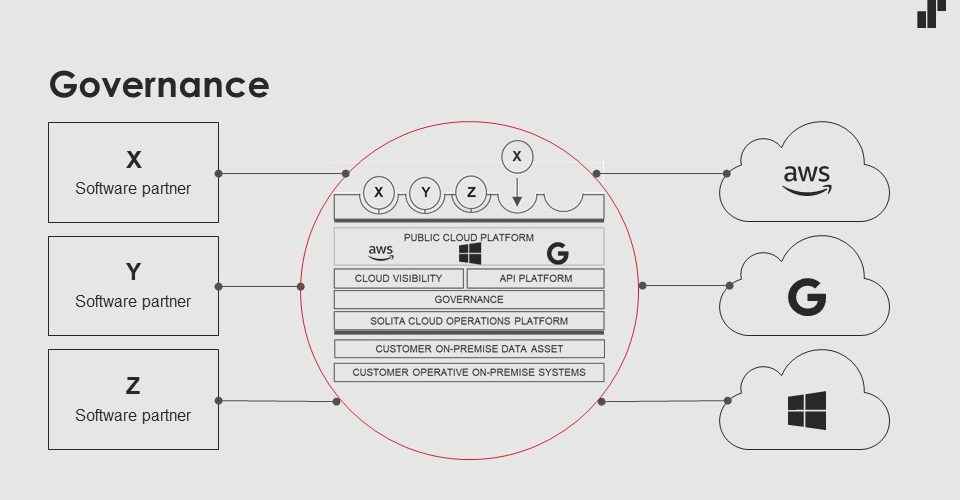
In summary, the architecture of the solution came out as follows.

Messaging system architecture in Azure


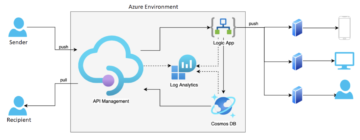
Broadly, the objectives set out at the start were achieved and the principles were followed (IaC, Azure components only, etc.). Clearly, Microsoft Azure offers a truly comprehensive suite of services with typically 99.95-99.99% SLAs; however, ‘the seven nines’ (99.99999%) or even higher are not uncommon. Such a high percentage is achieved through redundancy of components and data, optimised hardware usage, and exceptionally strict security measures in the region’s data centres.

Installing a system from scratch on an Azure account takes 45-60 minutes, and the lion’s share of this is provisioning API Management – a kind of heavyweight in Microsoft Azure, with a number of internal components hidden from the user (firewall, web server, load balancer, etc.).

There were no obstacles, but the development revealed that Terraform is a few steps behind Microsoft Azure as a third-party tool – in other words, when Microsoft launches a new Azure service, it will take time for HashiCorp developers to add functionality to their module. In this case, for example, the ARM template for the new component can be partially grafted into Terraform scripts, so that the creation of the infrastructure can be automated in any case.

In conclusion

Public cloud providers, such as Microsoft Azure, have hundreds of different services that can be considered Lego blocks – combining services to create the solution that best meets your needs.

The article describes how an MSP-like product was created from scratch that has reached the pre-live status by now. The same product can be assembled from different components – it all depends on the exact needs and on the possibilities to include other competencies, such as C# or Java developer’s. The public cloud is diverse, secure, affordable and ever evolving – there are very few reasons not to take advantage of it.

Thank you: Janek Rozov (SMIT), Timmo Tammemäe (SMIT), Märt Reose (SMIT), Kristjan Kolbre (‘Ole valmis!’), Madis Alesmaa (‘Ole valmis!’), Elisa Jakson (Women’s Voluntary Defence Organisation / ‘Ole valmis!’), Henrik Veenpere (Rescue Board).

Using Azure policies to audit and automate RBAC role assignments

Usually different RBAC role assignments in Azure might be inherited from subscription / management group level but there may come a time when that's just way too broad spectrum to give permissions to an AD user group.

While it’s tempting to assign permissions on a larger scope, sometimes you might rather prefer to have only some of the subscription’s resource groups granted with a RBAC role with minimal permissions to accomplish the task at hand. In those scenarios you’ll usually end up with one of the following options to handle the role assignments:

  1. Include the role assignments in your ARM templates / Terraform codes / Bicep templates
  2. Manually add the role to proper resource groups

If neither these appeal to you, there’s a third option: define an Azure policy which identifies correct resource groups and then deploys RBAC role assignments automatically if conditions are met. This blog will go over with step-by-step instructions how to:

  • Create a custom Azure policy definition for assigning Contributor RBAC role for an Azure AD group
  • Create a custom RBAC role for policy deployments and add it to your policy definition
  • Create an assignment for the custom policy

The example scenario is very specific and the policy definition is created to match this particular scenario. You can use the solution provided in this post as a basis to create something that fits exactly to your needs.

Azure policies in brief

Azure policies are a handy way to add automation and audit functionality to your cloud subscriptions. The policies can be applied to make sure resources are created following the company’s cloud governance guidelines for resource tagging or picking the right SKUs for VMs as an example. Microsoft provides a lot of different type built-in policies that are pretty much ready for assignment. However, for specific needs you’ll usually end up creating a custom policy that better suits your needs.

Using Azure policies is divided into two main steps:

  1. You need to define a policy which means creating a ruleset (policy rule) and actions (effect) to apply if a resource matches the defined rules.
  2. Then you must assign the policy to desired scope (management group / subscription / resource group / resource level). Assignment scope defines the maximum level of scanning if resources match the policy criteria. Usually the preferable levels are management group / subscription.

Depending on how you prefer governing your environment, you can resolve to use individual policies or group multiple policies into initiatives. Initiatives help you simplify assignments by working with groups instead of individual assignments. It also helps with handling service principal permissions. If you create a policy for enforcing 5 different tags, you’ll end up with having five service principals with the same permissions if you don’t use an initiative that groups the policies into one.

Creating the policy definition for assignment of Contributor RBAC role

The RBAC role assignment can be done with policy that targets the wanted scope of resources through policy rules. So first we’ll start with defining some basic properties for our policy which tells the other users what this policy is meant for. Few mentions:

  • Policy type = custom. Everything that’s not built-in is custom.
  • Mode = all since we won’t be creating a policy that enforces tags or locations
  • Category can be anything you like. We’ll use “Role assignment” as an example
{
	"properties": {
		"displayName": "Assign Contributor RBAC role for an AD group",
		"policyType": "Custom",
		"mode": "All",
		"description": "Assigns Contributor RBAC role for AD group resource groups with Tag 'RbacAssignment = true' and name prefix 'my-rg-prefix'. Existing resource groups can be remediated by triggering a remediation task.",
		"metadata": {
			"category": "Role assignment"
		},
		"parameters": {},
		"policyRule": {}
	}
}

Now we have our policy’s base information set. It’s time to form a policy rule. The policy rule consists of two blocks: policyRule and then. First one is the actual rule definition and the latter is the definition of what should be done when conditions are met. We’ll want to target only a few specific resource groups so the scope can be narrowed down with tag evaluations and resource group name conventions. To do this let’s slap an allOf operator (which is kind of like the logical operator ‘and’) to the policy rule and set up the rules

{
	"properties": {
		"displayName": "Assign Contributor RBAC role for an AD group",
		"policyType": "Custom",
		"mode": "All",
		"description": "Assigns Contributor RBAC role for AD group resource groups with Tag 'RbacAssignment = true' and name prefix 'my-rg-prefix'. Existing resource groups can be remediated by triggering a remediation task.",
		"metadata": {
			"category": "Role assignment"
		},
		"parameters": {},
		"policyRule": {
			"if": {
				"allOf": [{
						"field": "type",
						"equals": "Microsoft.Resources/subscriptions/resourceGroups"
					}, 	{
						"field": "name",
						"like": "my-rg-prefix*"
					},	{
						"field": "tags['RbacAssignment']",
						"equals": "true"
					}
				]
			},
			"then": {}
		}
	}
}

As can be seen from the JSON, the policy is applied to a resource (or actually a resource group) if

  • It’s type of Microsoft.Resources/subscriptions/resourceGroups = the target resource is a resource group
  • It has a tag named RbacAssignment set to true
  • The resource group name starts with my-rg-prefix

In order for the policy to actually do something, an effect must be defined. Because we want the role assignment to be automated, the deployIfNotExists effect is perfect. Few mentions of how to set up an effect:

  • The most important stuff is in the details block
  • The type of the deployment and the scope of an existence check is Microsoft.Authorization/roleAssignments for RBAC role assignments
  • An existence condition is kind of an another if block: the policy rule checks if a resource matches the conditions which makes it applicable for the policy. Existence check then confirms if the requirements of the details are met. If not, an ARM template will be deployed to the scoped resource

The existence condition of then block in the code example below checks the role assignment for a principal id through combination of Microsoft.Authorization/roleAssignments/roleDefinitionId and Microsoft.Authorization/roleAssignments/principalId. Since we want to assign the policy to a subscription, roleDefinitionId path must include the /subscriptions/<your_subscription_id>/.. in order for the policy to work properly.

{
	"properties": {
		"displayName": "Assign Contributor RBAC role for an AD group",
		"policyType": "Custom",
		"mode": "All",
		"description": "Assigns Contributor RBAC role for AD group resource groups with Tag 'RbacAssignment = true' and name prefix 'my-rg-prefix'. Existing resource groups can be remediated by triggering a remediation task.",
		"metadata": {
			"category": "Role assignment"
		},
		"parameters": {},
		"policyRule": {
			"if": {
				"allOf": [{
						"field": "type",
						"equals": "Microsoft.Resources/subscriptions/resourceGroups"
					}, 	{
						"field": "name",
						"like": "my-rg-prefix*"
					}, {
						"field": "tags['RbacAssignment']",
						"equals": "true"
					}
				]
			},
			"then": {
				"effect": "deployIfNotExists",
				"details": {
					"type": "Microsoft.Authorization/roleAssignments",
					"roleDefinitionIds": [
						"/providers/microsoft.authorization/roleDefinitions/18d7d88d-d35e-4fb5-a5c3-7773c20a72d9" // Use user access administrator role update RBAC role assignments
					],
					"existenceCondition": {
						"allOf": [{
								"field": "Microsoft.Authorization/roleAssignments/roleDefinitionId",
								"equals": "/subscriptions/your_subscription_id/providers/Microsoft.Authorization/roleDefinitions/b24988ac-6180-42a0-ab88-20f7382dd24c" // RBAC role definition ID for Contributor role
							}, {
								"field": "Microsoft.Authorization/roleAssignments/principalId",
								"equals": "OBJECT_ID_OF_YOUR_AD_GROUP" // Object ID of desired AD group
							}
						]
					}
				}
			}
		}

The last thing to add is the actual ARM template that will be deployed if existence conditions are not met. The template itself is fairly simple since it’s only containing the definitions for a RBAC role assignment.

{
	"properties": {
		"displayName": "Assign Contributor RBAC role for an AD group",
		"policyType": "Custom",
		"mode": "All",
		"description": "Assigns Contributor RBAC role for AD group resource groups with Tag 'RbacAssignment = true' and name prefix 'my-rg-prefix'. Existing resource groups can be remediated by triggering a remediation task.",
		"metadata": {
			"category": "Tags",
		},
		"parameters": {},
		"policyRule": {
			"if": {
				"allOf": [{
						"field": "type",
						"equals": "Microsoft.Resources/subscriptions/resourceGroups"
					}, 	{
						"field": "name",
						"like": "my-rg-prefix*"
					}, {
						"field": "tags['RbacAssignment']",
						"equals": "true"
					}
				]
			},
			"then": {
				"effect": "deployIfNotExists",
				"details": {
					"type": "Microsoft.Authorization/roleAssignments",
					"roleDefinitionIds": [
						"/providers/microsoft.authorization/roleDefinitions/18d7d88d-d35e-4fb5-a5c3-7773c20a72d9" // Use user access administrator role update RBAC role assignments
					],
					"existenceCondition": {
						"allOf": [{
								"field": "Microsoft.Authorization/roleAssignments/roleDefinitionId",
								"equals": "/subscriptions/your_subscription_id/providers/Microsoft.Authorization/roleDefinitions/b24988ac-6180-42a0-ab88-20f7382dd24c" // RBAC role definition ID for Contributor role
							}, {
								"field": "Microsoft.Authorization/roleAssignments/principalId",
								"equals": "OBJECT_ID_OF_YOUR_AD_GROUP" // Object ID of desired AD group
							}
						]
					},
					"deployment": {
						"properties": {
							"mode": "incremental",
							"template": {
								"$schema": "https://schema.management.azure.com/schemas/2015-01-01/deploymentTemplate.json#",
								"contentVersion": "1.0.0.0",
								"parameters": {
									"adGroupId": {
										"type": "string",
										"defaultValue": "OBJECT_ID_OF_YOUR_AD_GROUP",
										"metadata": {
											"description": "ObjectId of an AD group"
										}
									},
									"contributorRbacRole": {
										"type": "string",
										"defaultValue": "[concat('/subscriptions/', subscription().subscriptionId, '/providers/Microsoft.Authorization/roleDefinitions/b24988ac-6180-42a0-ab88-20f7382dd24c')]",
										"metadata": {
											"description": "Contributor RBAC role definition ID"
										}
									}
								},
								"resources": [{
										"type": "Microsoft.Authorization/roleAssignments",
										"apiVersion": "2018-09-01-preview",
										"name": "[guid(resourceGroup().id, deployment().name)]",
										"properties": {
											"roleDefinitionId": "[parameters('contributorRbacRole')]",
											"principalId": "[parameters('adGroupId')]"
										}
									}
								]
							}
						}
					}
				}
			}
		}
	}
}

And that’s it! Now we have the policy definition set up for checking and remediating default RBAC role assignment for our subscription. If the automated deployment feels too daunting, the effect can be swapped to auditIfNotExist version. That way you won’t be deploying anything automatically but you can simply audit all the resource groups in the scope for default RBAC role assignments.

{
	"properties": {
		"displayName": "Assign Contributor RBAC role for an AD group",
		"policyType": "Custom",
		"mode": "All",
		"description": "Assigns Contributor RBAC role for AD group resource groups with Tag 'RbacAssignment = true' and name prefix 'my-rg-prefix'. Existing resource groups can be remediated by triggering a remediation task.",
		"metadata": {
			"category": "Tags",
		},
		"parameters": {},
		"policyRule": {
			"if": {
				"allOf": [{
						"field": "type",
						"equals": "Microsoft.Resources/subscriptions/resourceGroups"
					}, 	{
						"field": "name",
						"like": "my-rg-prefix*"
					}, {
						"field": "tags['RbacAssignment']",
						"equals": "true"
					}
				]
			},
			"then": {
				"effect": "auditIfNotExist",
				"details": {
					"type": "Microsoft.Authorization/roleAssignments",
					"existenceCondition": {
						"allOf": [{
								"field": "Microsoft.Authorization/roleAssignments/roleDefinitionId",
								"equals": "/subscriptions/your_subscription_id/providers/Microsoft.Authorization/roleDefinitions/b24988ac-6180-42a0-ab88-20f7382dd24c" // RBAC role definition ID for Contributor role
							}, {
								"field": "Microsoft.Authorization/roleAssignments/principalId",
								"equals": "OBJECT_ID_OF_YOUR_AD_GROUP" // Object ID of desired AD group
							}
						]
					}
				}
			}
		}
	}
}

That should be enough, right? Well it isn’t. Since we’re using ARM template deployment with our policy, we must add a role with privileges to create remediation tasks which essentially means we must add a role that has privileges to create and validate resource deployments. Azure doesn’t provide such policy with minimal privileges out-of-the-box since the scope that has all the permissions we need is Owner. We naturally don’t want to give Owner permissions to anything if we reeeeeally don’t have to. The solution: create a custom RBAC role for Azure Policy remediation tasks.

Create custom RBAC role for policy remediation

Luckily creating a new RBAC role for our needs is a fairly straightforward task. You can create new roles in Azure portal or with Powershell or Azure CLI. Depending on your desire and permissions to go around in Azure, you’ll want to create the new role into a management group or a subscription to contain it to a level where it is needed. Of course there’s no harm done to spread that role to wider area of your Azure environment, but for the sake of keeping everything tidy, we’ll create the new role to one subscription since it’s not needed elsewhere for the moment.

Note that the custom role only allows anyone to validate and create deployments. That’s not enough to actually do anything. You’ll need to combine the deployment role with a role that has permissions to do the stuff set in deployment. For RBAC role assignments you’d need to add “User Access Administrator” role to the deployer as well.

Here’s how to do it in Azure portal:

  1. Go to your subscription listing in Azure, pick the subscription you want to add the role to and head on to Access control (IAM) tab.
  2. From the top toolbar, click on the “Add” menu and select “Add custom role”.
  3. Give your role a clear, descriptive name such as Least privilege deployer or something else that you think is more descriptive.
  4. Add a description.
  5. Add permissions Microsoft.Resources/deployments/validate/action and Microsoft.Resources/deployments/write to the role.
  6. Set the assignable scope to your subscription.
  7. Review everything and save.

After the role is created, check it’s properties and take note of the role id. Next we’ll need to update the policy definition made earlier in order to get the new RBAC role assigned to the service principal during policy initiative assignment.

So from the template, change this in effect block:

"roleDefinitionIds": [
	"/providers/microsoft.authorization/roleDefinitions/18d7d88d-d35e-4fb5-a5c3-7773c20a72d9" // Use user access administrator role update RBAC role assignments
]

to this:

"roleDefinitionIds": [
	"/providers/microsoft.authorization/roleDefinitions/18d7d88d-d35e-4fb5-a5c3-7773c20a72d9", // Use user access administrator role update RBAC role assignments
	"/subscriptions/your_subscription_id/providers/Microsoft.Authorization/roleDefinitions/THE_NEW_ROLE_ID" // The newly created role with permissions to create and validate deployments
]

Assigning the created policy

Creating the policy definition is not enough for the policy to take effect. As mentioned before, the definition is merely a ruleset created for assigning the policy and does nothing without the policy assignment. Like definitions, assignments can be set to desired scope. Depending on your policy, you can set the policy for management group level or individual assignments to subscription level with property values that fit each individual subscription as needed.

Open Azure Policy and select “Assignment” from the left side menu. You can find “Assign policy” from the top toolbar. There’s a few considerations that you should go over when you’re assigning a policy:

Basics

  • The scope: always think about your assignment scope before blindly assigning policies that modify your environment.
  • Exclusion is a possibility, not a necessity. Should you re-evaluate the policy definition if you find yourself adding a lot of exclusions?
  • Policy enforcement: if you have ANY doubts about the policy you have created, don’t enforce the policy. That way you won’t accidentally overwrite anything. It might be a good idea to assign policy without enforcement for the first time, review compliance results and if you’re happy with them, then enforce the policy.
    • You can fix all the non-compliant resources with a remediation task after initial compliance scan

Remediation

  • If you have a policy that changes something either with modify of deployIfNotExists effect, you’ll be creating a service principal for implementing the changes when you assign the policy. Be sure to check the location (region) of the service principal that it matches your desired location.
  • If you select to create a remediation tasks upon assignment, it will implement the changes in policy to existing resources. So if you have doubts if the policy works as you desire, do not create a remediation task during assignment. Review the compliance results first, then create the remediation task if everything’s ok.

Non-compliance message

  • It’s usually a good idea to create a custom non-compliance message for your own custom definitions.

After you’ve set up all relevant stuff for the assignment and created it, it’s time to wait for the compliance checks to go through. When you’ve created an assignment, the first compliance check cycle is done usually within 30 minutes of the assignment creation. After the first cycle, compliance is evaluated once every 24 hours or whenever the assigned policy definitions are changed. If that’s not fast enough for you, you can always trigger an on-demand evaluation scan.

Azure boards – does it make sprint planning enjoyable?

There are many different kind of services that aim to control development teams activities. Azure boards is one of them but it takes integration a one step further (into azure of course, why someone would want to use something else?)

Azure boards aims to make sprint planning easier and faster than ever before. Combining ease of use and plenty of customization options it sounds pretty good but is it worth a try?

I would say that if you are heavily using Azure already this is something you cannot miss. Boards takes everything one step further than its competitors. Sure you can have the same features on Jira too but it takes lot more work to get it done.

Boards uses Kanban -style board to manage tasks and combines that into deep integration into source control and Azure DevOps.

I am not going to go into every detail here but just to overview how we have used this board to manage sprint activities.
And also how to get relevant info into different stakeholders.

Lets Scrum

With this view we are building we have a different view for developers and people who want to have oversight on how things are progressing.

We use Scrum process as a starting point where views are divided into backlog items and features.


If you are starting a new board choose “Scrum” as the process when creating a board under advanced options


If you already have a boards in use and you are not using “Scrum” you need to change the current process into scrum. To change it go to organizational settings and choose process under boards.

There we see all the available processes.
Choose Basic by clicking it. This is the default process that boards assigns to your board when creating.

Then select projects and under this you see your board, in this case “Test board”. Press the three dots and select “change process”

Select “Scrum” from the dropdown menu and off you go.


Depending on how much items you already have on your board you might need to resolve some conflicts like wrong type of items.

Now go to your board see that there is now different views for backlog item and features. Structural flow is that backlog items are child items for features.  Features simply define a feature that is being implemented and backlog items are steps to get it done.

Let’s start by creating a feature.
Make sure you are at Feature view at boards. This can be changed at top right corner dropdown menu. (choose Features)


Click “New item” and name the Feature, in this case i named it as Testi feature nro 3 as i have couple of items done already. Then we proceed to make a backlog item belonging into this feature.


Click the three dots on the right hand corner of the item and choose “Add product backlog item” to add a child backlog item. Name the item as you like.


Once you made a first backlog item under feature you don’t need to go through that three dots menu again to make more backlog items. Because now there is a “Add product backlog item” straight at the card.

And you can add more items by just clicking it.


Now we have some content on our board and we can see how this is structured. We have two views now. A backlog item view and feature view.

Backlog item view is used mainly by developers where they see individual tasks and what is their status.
Choose this board by clicking upper right hand corner drop down menu and select “Backlog items”

This presents a view of backlog items and their statuses. This is pretty standard view, there are items and they are assigned to developers

By clicking open one item you can see more info like which feature is a parent for that item.


Another view that we use here is a feature view. This is to be used by people who are supervising developers or a client who would like to see how things are progressing.

Choose this board by clicking top hand corner dropdown menu and choose “Features”

The beef here is that this view presents immediate visualization on what is the status of features and how many backlog items under that feature are done. And we don’t want use same view for everyone as this would be a compromise.

Customize

Now lets look a bit into customizing the Scrum process. As it is often a case that we need something that is not part of the standard process.


Click Azure DevOps logo on the left top corner and click “Organizational Settings” at the bottom


Select “Process” under Boards


For us to be able to make customizations into processes we need to make a copy of them. Original processes cannot be customized.

Click the three dots next to “Scrum” and click “Create inherited process”

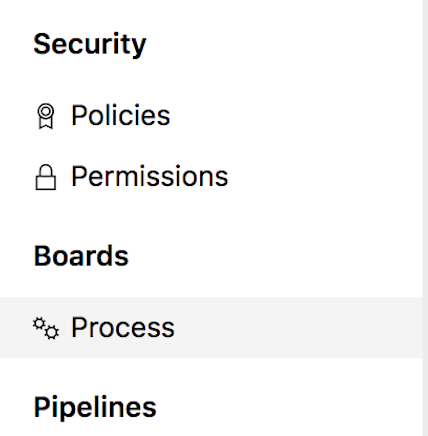
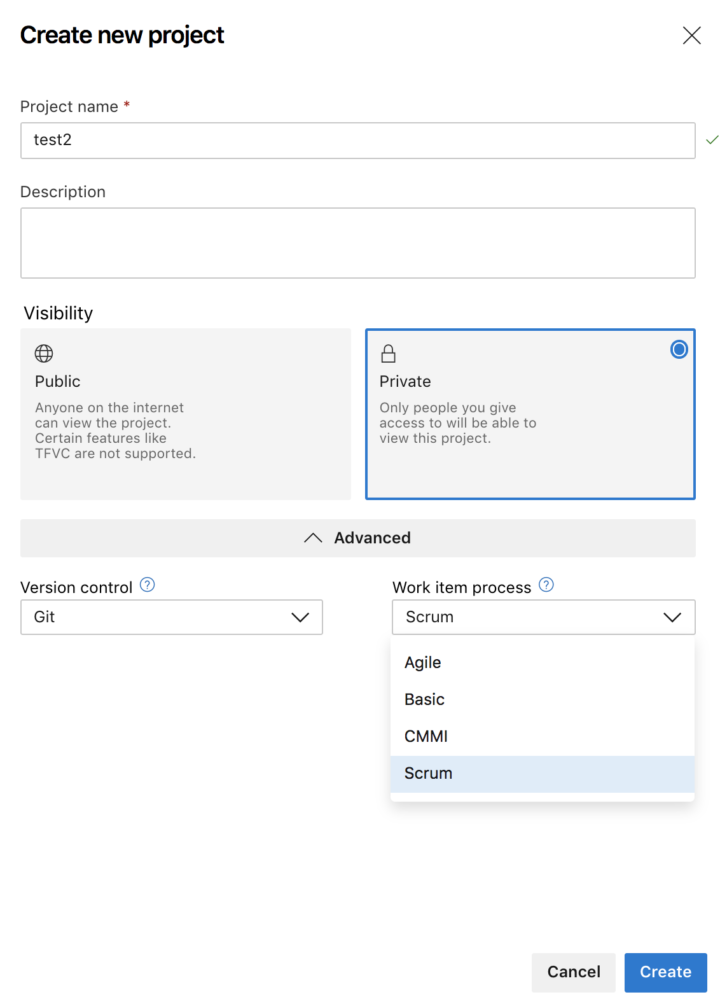
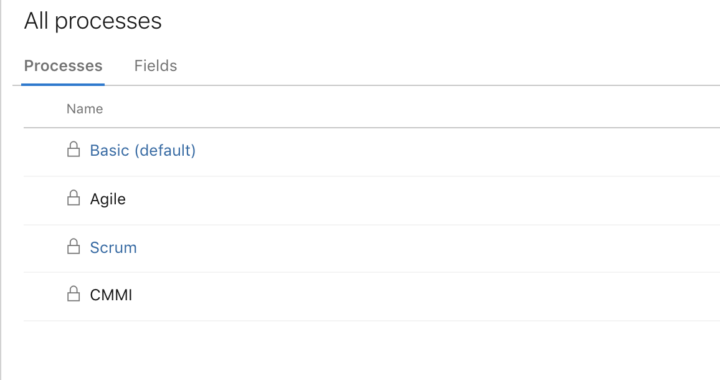
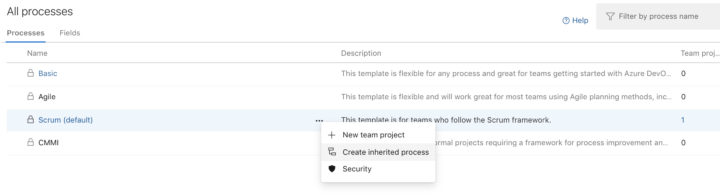
Name the process as “Scrum customize”
And once done select and choose “Set as default process” to take this into use.

Click “Scrum customize” process to open the following screen.

Click “Product Backlog Item” to make a customization for that item type and how board handles it.

Choose “Rules” and “New Rule”.
Customization we are doing here is that we want to assign a product backlog item automatically into person once that item is moved into “Committed”

See the following screenshot on how this is done.

First we make sure we don’t overwrite assignee with this rule as we check that “Assigned To” field is empty. Then we check that when the state is changed from “Approved” to “Committed”. As with Scrum this is the normal flow, once item is appoved a developer can start to work on that and then state is “Committed”

once all the previous rules are met we change the “Assigned To” for the person moving the item into “Committed” state.

With this kind of simple changes we make it faster to handle items on boards and take away those annoying things that you need to do manually everytime.

There are lots of other stuff that you can do with boards. But this was just a small look into what is possible and how we have seen this is best used.

If you have any questions about Azure Boards or any cloud related matters please do not hesitate to contact me

toni.kuokkanen@solita.fi
+358 40 1897586
https://www.linkedin.com/in/tonikuokkanen/


No public cloud? Then kiss AI goodbye

What’s the crucial enabling factor that’s often missing from the debate about the myriad uses of AI? The fact that there is no AI without a proper backend for data (cloud data warehouses/data lakes) or without pre-built components. Examples of this are Cloud Machine Learning (ML) in Google Cloud Platform (GCP) and Sagemaker in Amazon Web Services (AWS). In this cloud blog I will explain why public cloud offers the optimum solution for machine learning (ML) and AI environments.

Why is public cloud essential to AI/ML projects?

  • AWS, Microsoft Azure and GCP offer plenty of pre-built machine learning components. This helps projects to build AI/ML solutions without requiring a deep understanding of ML theory, knowledge of AI or PhD level data scientists.
  • Public cloud is built for workloads which need peaking CPU/IO performance. This lets you pay for an unlimited amount of computing power on a per-minute basis instead of investing millions into your own data centres.
  • Rapid innovation/prototyping is possible using public cloud – you can test and deploy early and scale up in the production if needed.

Public cloud: the superpower of AI

Across many types of projects, AI capabilities are being democratised. Public cloud vendors deliver products, like Sagemaker or CloudML, that allow you to build AI capabilities for your products without a deep theoretical understanding. This means that soon a shortage of AI/ML scientists won’t be your biggest challenge.  Projects can use existing AI tools to build world-class solutions such as customer support, fraud detection, and business intelligence.

My recommendation is that you should head towards data enablement. First invest in data pipelines, data quality, integrations, and cloud-based data warehouses/data lakes. So rather than using over-skilled AI/ML scientists, build up the essential twin pillars – cloud ops and skilled team of data engineers.

Enablement – not enforcement

In my experience, many organisations have been struggling to transition to public cloud due to data confidentiality and classification issues. Business units have been driving the adoption of modern AI-based technology. IT organisations have been pushing back due to security concerns.  After plenty of heated debate we have been able to find a way forward. The benefits of using public cloud components in advanced data processing have been so huge that IT has to find ways to enable the use of public cloud.

The solution for this challenge has proven to be proper data classification and the use of private on-premises facilities to support operations in public cloud. Data location should be defined based on the data classification. Solita has been building secure but flexible automated cloud governance controls. These enable business requests but keep the control in your hands, as well as meeting the requirements usually defined by a company’s chief information security officer (CISO). Modern cloud governance is built on automation and enablement – rather than enforcing policies.

Conclusion

  • The pathway to effective AI adoption usually begins by kickstarting or boosting the public cloud journey and competence within the company.
  • Our recommendation – the public cloud journey should start with proper analyses and planning.
  • Solita is able to help with data confidentiality issues: classification, hybrid/private cloud usage and transformation.
  • Build cloud governance based on enablement and automation rather than enforcement.

Download a free Cloud Buyer's Guide

Modern cloud operation: successful cloud transformation, part 2

How to ensure a successful cloud transformation? In the first part of this two-part blog series, I explained why and how cloud transformation often fails despite high expectations. In this second part, I will explain how to succeed in cloud transformation, i.e. how to move services to the cloud in the right way.

Below, there are three important tips that will help you reach a good outcome.

1. Start by defining a cloud strategy and a cloud governance model

We often discuss with our customers how to manage, monitor and operate the cloud and what things should be considered when working with third party developers. Many customers are also interested to know what kinds of guidelines and operating models should be determined in order to keep everything under control.

You don’t need a big team to brainstorm and create loads of new processes to define a cloud strategy and update governance models.

To succeed in updating your cloud strategy and governance model, you have to take a very close look at things and realise that you are moving things to a new environment that functions differently from traditional data centers.

So it’s important to understand that for example software projects can be developed in a completely new way in the cloud with multiple suppliers. However, it must be kept in mind that this sort of operation requires a governance model and instructions on what kind of minimum requirements the new services that are to be linked to the company’s systems should have and how their maintenance and continuity should be taken care of. For instance, you have to decide how you can ensure that cloud accounts, data security and access management are taken care of.

2. Insist on having modern cloud operation – choose a suitable partner or get the needed knowhow yourself

Successful cloud transformation requires right kind of expertise. However, traditional service providers rarely have the required skills. New kinds of cloud operators have emerged to solve this issue. Their mission is to help customers manage cloud transformation. How can you identify such operators and what should you demand from them?

The following list is formed on the basis of views presented by Gartner, Forrester and AWS on modern operators. When you are looking for a partner…

  • demand a strong DevOps culture. It forms a good foundation for automation and development of services.
  • ensure cloud-native expertise on platforms and applications.It creates certainty that an expert who knows the whole package and understands how applications and platforms work together is in charge of the project.
  • check that your partner has skills in multiple platforms. AWS, Azure and Google are all good alternatives.
  • ask if your partner masters automatic operation and predictive analytics. These skills reduce variable costs and contribute to quick recovery from incidents.
  • demand agile operating methods, as well as transparency and continuous development of services. With clear and efficient service processes, cost management and reporting are easier and the customer understands the benefits of development.

Solita’s answer to this is a modern cloud operation partnership. In other words, we help our customers create operating models and cloud strategies. A modern cloud operator has an understanding of the whole package that has to be managed and helps to formulate proper operating models and guidelines for cloud development. It’s not our purpose to limit development speed or opportunities, but we want to pay attention to things that ensure continuity and easy maintenance. After all, the development phase is only a fraction of the whole application life cycle.

The developer’s needs are taken into account, and at the same time, for instance the following operating models are determined: How are cloud accounts created and who creates them? How are costs monitored? What kind of user rights are given and to whom? What sort of development tools are used or what targets should be achieved with them? We are responsible for deciding what things are monitored and how.

In addition, the right kind of partner knows what things should be moved to the cloud in the first place.

When moving to cloud, the word move doesn’t fit very well in this context because it is rarely recommended just to move workloads. That is why it’s better to talk about transformation, which means transforming an existing worksload at least with some modifications towards cloud native.

In my opinion, application development is one important skill a modern cloud operator should master. Today, the cloud can be seen as a platform where different kinds of systems and applications are coded. It takes more than just the ability to manage servers to succeed in this game. Therefore, DevOps culture determines how application development and operation work together. You have to understand how environments are automated and monitored.

In addition to monitoring whether applications are running, experts are able to control other things too. They can analyse how an application is working and whether it is performing effectively. A strong symbiosis between developers and operators helps to continuously develop and improve skills that are needed to improve service quality. At best, this kind of operator can promise their customers that services are available and running all the time, and if they are not, they will be fixed at a fixed monthly charge. The model aims to minimise manual operation and work that is separately invoiced per hour. For instance, the model has allowed us reduce our customers’ billable hours by up to 75%.

With the addition of knowledge on the benefits and best features of different cloud services, as well as capacity use and invoicing, you get a package that serves customers’ needs optimally.

3. Don’t try to save in migration! Make the implementation project gradual


Lift & shift type transfers, i.e. moving old environments as they are, don’t generate savings very often. I’m not saying that it couldn’t happen, but the best benefits are achieved by looking at operating models and the environment as a whole. This requires a comprehensive study of the things that should work in the cloud and how the application is integrated in other systems.

The whole environment and its dependencies should be analysed, and all services should be checked one by one. After that you plan migration, and it is time to think what things can be automated. This requires time and money.

A migration that leads to an environment that has been automated as much as possible is a good target. It should also lower recurrent costs related to operation and improve the quality of the service.

Solita offers all services that are needed in cloud transformation. If you are interested in the subject, read more about our services on our website. If you have any questions, please feel free to contact us!

Download a free Cloud Buyer's Guide

Deploying an application on a global scale

Running your application on global scale is now much more easier than ever before, here i go through one scenario how to achieve this.

Building and deploying an application on a global scale is now easier than ever. Using the cloud you can easily have your application running close to the customers no matter where they are located.

There are some things to take into consideration when planning and building a deployment. In this post I am using Microsoft Azure service offering as an example but at least Amazon Web Services and Google Cloud Platform have similar services available.

As with real estate, most important thing is location, location, location.

Your end user location defines which cloud to use and where to push applications. China is a totally different game compared to running everything in EU/US area.

Make sure that your application is built to scale from the start, for example DB should be something that is geo-replicated. SQL or Cosmos DB on Azure.

Once you have mapped the regions where an application will be mostly used you can start planning the deployment process.

Traffic manager for geo-balancer

Use the Azure traffic manager to route incoming requests into the nearest region to get the lowest latency from application to end users. Also, with this design if one region is having an outage, the nearest one will continue to serve the customers. Also make sure you put different regions into separate resource groups as this lets you manage each region as a single collection.

Failover can be done with a Traffic manager health probe, which probes the application and checks the health of app services, storage and DB. Make sure you follow design patterns on the health probe so that some lower priority outages don’t mark the whole regions as unavailable.

Traffic manager also supports several routing methods, and, in this case, we would be using Geographic as we want to use location as deciding factor where to route traffic.

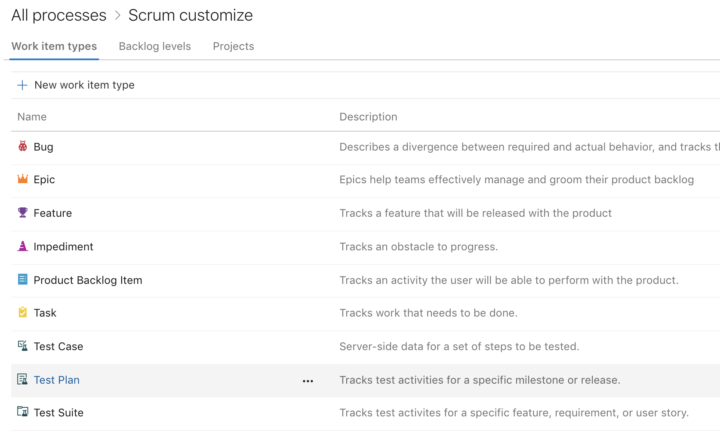
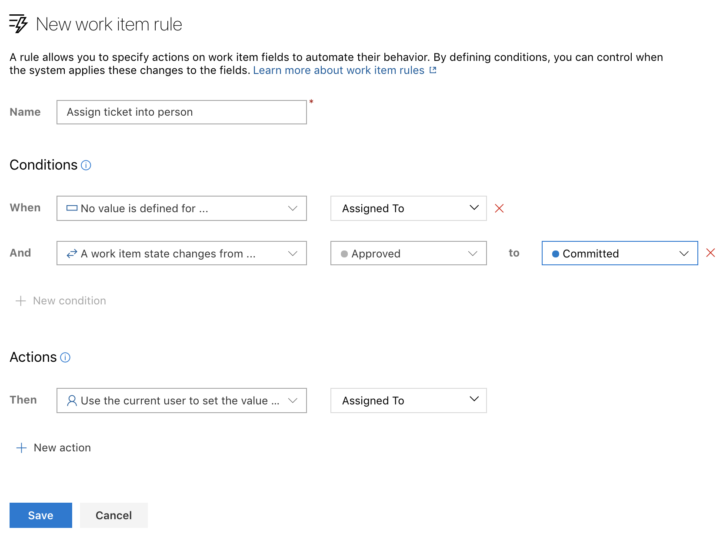
Multiregion deployment needs some extra attention

For storage, the best option is to use Read-access geo-redundant storage (RA-GRS) as this gives best replication options for this use case. But there are some caveats to consider when using this option. For example, if there is a zone wide outage then there is a short time period when the data is in a read-only model until the failover happens from region to region.

Deploying an application into a single region is pretty straightforward. But as we are planning to do a multi-region deployment, we should deploy the application into multiple regions in an automated fashion. If you are using Azure DevOps, all you have to do is make several deployment slots to push the application into different regions.

This article covered just one scenario about what to consider when deploying an application to the cloud. When you build your application to be cloud capable from day one, the more benefits the cloud can offer. Don’t let the old ways hold you back. Explore and test different workloads, try containers and see how easy it is to have a true scaling and build deployment pipelines in the cloud.

Modern cloud operation: successful cloud transformation, part 1

Today, many people are wondering how they could implement cloud transformation successfully. In the first part of this two-part blog series, I explain why and how cloud transformation often fails despite high expectations. In the second part, I will describe how cloud transformation is made and what the correct way of migrating services to the cloud is.

Some time ago at Solita HUB event, I talked about modern cloud operation and successful cloud transformation. Experiences that our customers had told us about, served as the starting point for my presentation. I wanted to share some of those also with you.

People have often started to use the cloud with high expectations, but those expectations have not really been met. Or they have ended up in a situation where nobody has a good picture of what things have been moved to the cloud or what has been built there. So they’ve ended up in cloud service mess.

People have often started to use the cloud with high expectations, but those expectations have not really been met.

In recent years, people have talked a lot about the cloud and how to start using it. Should they move their systems there by Lift & Shift their existing resources as they are, or should they make new cloud-native applications and systems? Or should they do both?

They might have decided to make the cloud transformation with the help of their own IT department, using an existing service provider or – a bit secretly – with a software development partner. No matter what the choice is, it feels like people are out to make quick profits and they haven’t stopped to think about the big picture and how to govern all of this.

The cloud is not a data centre

Quite often I hear people say “the cloud is only somebody else’s data center”. That is exactly what it is if you don’t know how to use it properly. When we think how the systems of a traditional service provider or our own IT departments has been built, it’s no wonder that you hear statements like this.

Download a free Cloud Buyer's Guide

Before, the aim was to offer servers from data center with maintenance and monitoring for operating systems. The idea was that first you specified what kind of capacity you want and how environments should be monitored. Then it was agreed how to react to possible alerts.

The architecture has been designed to be as cost-efficient as possible. In this model, efficiency has relied on virtualisation and, for instance, on the decision whether to build HA systems or not. Especially solutions with two data centers have traditionally been expensive.

When people have started to move this old operating model to the cloud, it hasn’t functioned as they had planned and hoped for. Therefore, it can be said that the true benefits of the cloud will not be gained in the traditional way.

Cloud transformation is not only about moving away from own or co-location data centers. It’s about a comprehensive change towards new operating methods.

It is very wise to build the above-mentioned HA systems in a cloud, because they won’t necessarily cost much or are build-in features. The cloud is not a data centre, and it shouldn’t be considered as one.

Of course, it’s possible to achieve savings with traditional workloads, but still, it is more important to understand that operating methods have to change. Old methods are not enough, and traditional service partners don’t often have adequate skills to develop environments using modern means.

Lack of management causes trouble in cloud services

In some cases, services are built in to cloud together with a software development partner. They have promised to create a well-functioning system quickly. And this can be the case in the cloud at its best. But without management or an proper governance model, problems often occur. The number of different kind of cloud service accounts may increase, and nobody in the organisation seems to know how to manage the accounts and where costs come from.

In addition, surprisingly often people believe that cloud services do not require maintenance and that any developer is able to build a sustainable, secure and cost-effective environment. They are surprised to notice that it’s not that simple.

‘No-Ops’, and maybe the word ‘serverless’ could belong to this same category, are terms that unfortunately have been misunderstood a bit. Only a few software development partners have corrected this misunderstanding, or they haven’t realised themselves that cloud services do require maintenance in reality.

It’s true that services that function relatively well without special maintenance can be built in the cloud, but in reality, No-Ops doesn’t exist without seamless cooperation between developers and operations experts, in other words DevOps culture. No-Ops does mean extreme automation which doesn’t happen on its own. It really isn’t possible everytime, and it is not always worth pursuing.

At Solita, operation has been taken to an entirely new level. Our objective is to make us “useless” as far as daily routines are concerned. We call this modern cloud operation. With this approach, we have, for instance, managed to reduce our customers’ hourly billing considerably. We have also managed to spread our operating methods from customers’ data centers all the way to the cloud.

In my next blog, I will focus on things that should be considered in cloud transformation and explain what modern cloud operation means in practice.

Anton works as a cloud business manager at Solita. Producing IT cost-efficiently from desktops to data centers is close to his heart. When he is not working on clouds, he enjoys skiing, running, cycling, playing football. He is excited about all types of gadgets related to sports and likes to measure and track everything.

Download a free Cloud Buyer's Guide